I know I haven't posted very often lately, but please don't give up on me! It's been a perfect storm lately, but I think I'm getting my momentum back. :)
A month ago I
directed you to
this tutorial I did for Ucreate. Now I'm sharing my gathered-ribbon poof pillow tutorial with you here!

So, begin by gathering your supplies:

3/4 yard of a solid color for the foundation fabric and the back
6-10 yards of ribbon (depending on width, how gathered you want it, and size of your pillow. color should coordinate with the foundation fabric but doesn't need to match exactly.)
pillow form

ruler
fabric marking pen
string (if you're going to follow my steps to turn a square pillow form into a circle)
sewing scissors
sewing pins
I'm going to first show you how to turn a square pillow form into a circle. You can skip this step if you have a circular pillow already or if you want to follow the tutorial but onto a square instead of the circle. One of the nice things about doing this, though, is that your pillow form ends up being very full and giving a great shape to your finished cover.
Transforming the Pillow Form
Begin by measuring the pillow and marking the center on all four sides. then connect the marks across the top of the pillow to find the center. Once you have the center, push a pin with string attached into the center and tie your fabric marking pen onto the string at a good length for you to be able to reach the center of one of the sides. Like this:

Now, keeping the pen at the same angle, drag it from one side to the adjacent side, so that you're drawing 1/4th of a circle. It should look something like this:

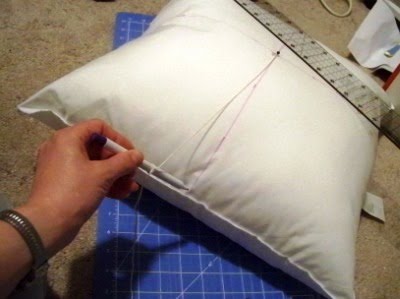
From here, push all the stuffing into the center of the pillow, and pin your mark to the back of the pillow:

Notice here that you can see two lines? I messed up, but it's ok because this will be hidden inside the pillow and I'm using a fabric marking pen that disappears. ;)

Now take it to your machine and sew (carefully!) along your mark. Make sure to take your pins out before you sew over them. Sometimes I risk it, so I have a bunch of bent pins and a few broken needles. Learn from my mistakes! (Or just buy lots of pins and needles.)

If, like me, you hate hand sewing with a passion, follow me and do this with your machine. If you don't mind sewing, I think this can be hand stitched as well. Just make sure your stitches are close and tight.
Next cut off the excess corner (sorry, no picture).
Continue and finish the other 3 corners, and now your pillow form should look like this:

Yay! You're just taken a square pillow form and turned it into a circle. This could also be modified for other simple shapes.
Cutting the Front Foundation Fabric and Back Pieces
Now take out your foundation fabric, iron it, and cut out a square an inch or so longer on each side than your pillow form is wide (hint: the original tag should show the dimensions. If not, just measure across one of the center lines you have marked). Once you have the square cut, fold it in half and then again in half the other way. Now you should have a square of material like this:

Take your ruler and measure out from the center of the material (which will be one of the corners of the folded fabric), mark half the width of the pillow plus 1/2" for seam allowance. Do this from the center all along the top of the folded material. Now connect the dots, following the edge of the quarter-circle, and pin along the curve you just marked. It should look like this:

Notice that I have the pins just to inside of the curve so that I can cut along the mark. Unfold, and you should have very close to a perfect circle:

Lay your circle of material on top of your pillow form to see if you like the fit or if you want to trim a little before you start:

Now cut two pieces for an envelope closure on the back. Cut one about 1/2 the height of the pillow, and one 2/3 the height. Fold and pin for a simple seam on each exposed edge. Use the circle front to get an overlap that looks about like this:

Then, starting at one side, begin pinning along the seam. This is the back to show the pins:

Now use your front as a template to mark the circle onto the back:

And cut along your marked line:

When you're done cutting the back pieces to the shape of your front, very carefully take the pins out one or two at a time and switch them to pinning just the two pieces of the back together so that you can work with the front foundation fabric. You'll want the back pieces to be pinned together until the very last step.
Mark the Front Foundation Piece
Measure the width of your ribbon, and mark a curve about 1/4" less than that away from the edge (so for a 1.25" ribbon, mark each 1"). To start, make a mark on the edge and another at the correct distance from the edge about 5" along the perimeter. So your line should look something like this to start:
 Now continue along the perimeter:

Once you get your first line drawn, you need to mark a approximate distances across the whole surface of the front foundation fabric. To do this, I marked my center point and then put my ruler across that point and marked every 1-inch interval. After turning the ruler and doing this across the fabric several times, it looked like this:

Then fill in any emptier spots:

And a few more for good measure, if you're like me and can't draw a good curve without help:

Now begin at your outside line and spiral toward the middle following your starting point to make the jump to interior circles. It should look like this when you're done:

It gets a little tricky toward the center. Just do the best you can. You'll be covering this with gathered ribbon, so it's pretty forgiving.
Gathering the Ribbon
Now it's time to get started with your ribbon.

I combined the steps for gathering that I used here with this clever tip from Little Birdie Secrets. I created my gather along one side. To begin I did a back stitch.

Then, using my seam ripper to scrunch it, I sewed slowly as I pushed the ribbon toward the presser foot. After a few inches, it starts to look like this:

Keep doing this until you need a break or you reach the end of your first spool of ribbon (if you do reach the end, stop about 5 inches short and backstitch. I'll show how to continue to another spool in a few steps). I decided to switch back and forth between gathering the ribbon and sewing it to the foundation fabric, so I just back-stitched when I got tired of gathering and switched.

Sewing the Ribbon to the Foundation Fabric
Beginning at the mark starting on the extreme outer edge, start pinning along your line towards the center. Don't worry about the raw end of ribbon hanging off the side; we'll take care of that when we sew the front and back together. Now use a straight stitch to sew the gathered ribbon along the line. As I said before, this doesn't have to be a perfect straight stitch - the gather of the ribbon makes this very forgiving. When you've finished the first line, it should look like this:

Now continue gathering, pinning, and sewing:
 Until you've finished the first spool of ribbon.

When you get to the end, pin the start of your new ribbon to the end of your first ribbon, right on top with a 1/4" overlap rather than right sides together as you usually do. Then use a zigzag stitch to attach the two. I usually go back and forth across the entire length to make sure it's nice and secure. It should look like this:

Now continue gathering, pinning, and sewing (and attaching ribbons depending on the length of a spool) until you reach the center.
 When you get to the center, just fold the very end over about 1/4" and stitch the center down with a straight stitch in an x-shape at the center:


The gather should make it fluff enough that you can leave the center like this, but if you would like to add something, you could use a fabric flower, a fabric-covered button, or a decorative button just to give you some ideas.
Now you're done with your cover and ready to attach the back:

Finishing The trickiest part of attaching the back is avoiding the first line of ribbon. Just fold the ribbon towards the middle at the free side and pin the cover and the back with right sides together. At the very beginning of the ribbon along the edge, sew the raw edge of the ribbon sandwiched between the foundation fabric and back. It should look like this along the edge when you pin it:
 And this when you're done sewing:

Now carefully take out the pins holding the envelope closure together and flip it right-sides out through the opening. Stuff the pillow form into the cover:
 And you're done!


If you make one of these, I'd love to see it! I'll be posting to the parties on the left.