Showing posts with label Decor. Show all posts

Thursday, August 2, 2012

No Eating off the Floor - Free Printable


I'm still working on that kitchen wall.  It's slowly coming along.  I saw this print and loved it.  Partly because not scavenging off the floor is something we're working on with both the 3-year-old and the 11-month-old. Sigh.  But I decided I wanted to tweak it a bit for something a little less soothing since it's for a kitchen rather than a nursery.  I remembered coming across this series a few years ago, and decided that would be perfect, so I used PSE to make my own By Order of the Management sign for our kitchen.
 

And I love how it works on my wall!

(Ignore the plain white plate, please, it's a placeholder.)


So feel free to grab it.  Just right-click on the following picture and save to your computer.  It's sized to 8x10.


And, if you're interested, here's a cheat sheet for all the prints & projects currently on the wall.


1.  No Eating off the Floor printable
2.  Cupcake printable
3.  EAT kitchen letters
4.  Shadowbox flower
5.  Cupcake specimen art
6.  Gecko from our Honeymoon to Mexico
7.  Heart plate from Target
8.  Raised Numbers Wall Clock from Target


Tuesday, April 24, 2012

Faux Oilcloth-Covered Kitchen Table

No Ten on Tuesday today.  Instead, I want to share a quick project I worked on this weekend.  


There's a saga behind this project, but I won't bore you with the details.  Instead, let's look at some pretty pictures:
 (Please follow the source link before pinning these - they aren't my projects, and I shouldn't get credit.  Thanks!)


Gorgeous oilcloth-covered tables!  And they used several different methods for covering: staple gun, sewing elastic around the edge, sewing a seem to fit, even hot glue!  

I wanted to replicate the look on the cheap and easy.  I wasn't sure how it would work in my kitchen, so I didn't want to commit without trying it out (which meant staples, nails, and glue guns were out).  And I didn't want to sew, which meant the other methods shown were out as well.  

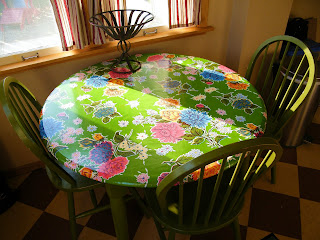
So first I started with a vinyl tablecloth from Target. WAY cheaper than oilcloth, and I wouldn't be nearly as upset about cutting it up (or throwing it away if I didn't like it).  I put it on top of the table and cut around the perimeter about 6" away from the edge of the table.  Next, I cut little slits all along the edge of the tablecloth about an inch from the edge. I used a safety pin to weave string through the slits.  Pulled it snug, tied it off, and called it good. 


 Seriously cheap AND easy.  


I LOVE how it looks.   I love that it doesn't cut off my line of sight like a tablecloth does.  My husband and I both love that we can wipe it off with a washcloth.  I love that when I get tired of it, I can buy another one without freaking out about how expensive it was and how much time and effort I poured into it.  

I'll be linking this to the parties on the left!

Wednesday, March 21, 2012

Happy Spring!

No Ten on Tuesday post this week.  And this is a day late, but Happy Spring!  

Really quickly, I want to show off a bit.  Here's my Spring wreath for this year:


And here's the paper-pieced top for my mini-quilt inspired by this quilt.  I just made a paper-piecing pattern and then went with it when it tended toward wonky.  I'm debating how to embellish and quilt it. 

Tuesday, January 31, 2012

Printables (Including My Cupcake Printable!)

I know, I've effectively fallen off the planet.  I've actually been working on some crafty stuff (birthday cake, banners, wall decorations, oh and a baby), but I haven't been spending much time telling people about it.  So here's a quick little post to share some links to some free printables I've discovered recently.  One day I'll even share a picture of them on my wall.  :)


And this next one is a little 8 x 10 printable I made up for my kitchen wall.  A WhimsiKel original.  My vision for that wall keeps changing, but lately I'm thinking cupcakes are a good place to start.  (Side note: if you're having a tough day, go search "pink cupcake charm" on etsy.  You'll feel better almost immediately.)  So feel free to grab it if you want.  I'll only be SUPER excited if you do.  :)


Tuesday, October 25, 2011

Halloween Wreath

No guarantees or anything, but I might start posting more frequently than every three months.  I finished the project I mentioned in June 8 weeks ago today.  Mason Bryce was born 5 1/2 weeks early at a healthy 6 lb 10 oz.  He had to spend a week in the NICU, but all things considered, we feel very blessed that there were no other complications. 
I've been working on quite a few projects the last few weeks, but one of them has been trying to fix a virus on our computer, so my blogging has stayed back burner.  I did want to hop on really quick to share a picture of my Halloween changing seasons wreath, though.


It's inspired by my wreath last year and all the wreaths I've seen in my blog-walking and on pinterest that are wrapped-yarn.  I still love those bats.  And I'm still loving teal.

Sunday, January 30, 2011

Throw Pillow Round-Up

Well, I have not done as well as Nicole on posting about my Thirty Before 30 list as I've been working on it.  Part of that is because I haven't done as well at WORKING on it as she did.  And part is just the general lack of blogging motivation the last few months.  But I have accomplished some things from that list, so over the next few weeks I'll try to post some of those results.

#7 on the list was finish my throw pillows.  In retrospect, that was just an ill-thought-out goal.  I'll never be FINISHED with my throw pillows!  There are too many fun new ideas that pop up each week, and I get too bored with the status quo to ever be DONE making throw pillows.  Silly.

But I think that coming to that understanding accomplishes the same goal.  The point was to cross something off my list so that it wouldn't be hanging over my head making me feel discouraged from my lack of completion and like I hadn't worked hard enough or stayed focused enough.  That's done.  Now that I've shifted my paradigm, the joy really is in the journey!  So I've decided instead to show you all some of the MANY throw pillows I've bookmarked over the last little while.  I will also add a linky at the bottom so that you can share any you like and recommend as well.


 Now it's your turn!  Feel free to link up ANY pillow as long as a link is provided to give credit to the originator.  Share pillows you've made or want to make.  These don't have to have tutorials, either.  Just something that inspires you to create!


Monday, November 22, 2010

EAT Kitchen Letters Tutorial

As promised, here is the tutorial for my EAT kitchen letters!  This is a pretty detailed tutorial; probably too detailed (don't be offended when I instruct how to trace and cut out letters, for instance), but I figured I'd cover as much as possible.  :)

Supplies
Paper mache letters (E, A, and T) - you could use wood as well
scrapbooking paper
spray adhesive or mod podge
acrylic paint in a coordinating color
straight-edge (ruler or similar)
exacto knife

Start with your letters. 


Use your acrylic paint to cover the sides of the letters.  Also, paint a small edge onto the front of the letters.  This will be helpful when you're ready to put the scrapbook paper on. 


When you've painted all the letters, place your first letters on the back (or front, you won't see the marks when you're done) and use a pencil to trace around the letter.


It should look like this when you're finished tracing.


This next part is the most important for having clean lines on your letters when you're done.  Use a straight-edge (ruler or box edge) to cut slightly inside your traced line with an exacto knife.  Cut a little bit smaller than your traced shape so that a bit of the paint on the edge can be seen on the front.


Like so:

Now grab your spray adhesive or modge podge and glue the scrapbook paper to the front of all three letters.


There are several ways you could hang these up.  You could glue a string or sawtooth hanger on the back.  You could try some of those command strips.  I wanted quick, easy, and totally flush with the wall, so this is what I did.

First, measure down 1" (or 1/2", the important thing is for it to be a measured, specific distance) from the top of each lette:


Then use a ruler to measure the center.


And mark your location.  The point where the two lines meet is where you're going to make a small hole.


I decided to use a wood screw.  I hammer it in enough to break through the layer, then I pull it in and out and move it in a circle a little to make the hole a little bigger.  (Note: This only works because these are hollow paper mache letters.  If your letters are solid, you'll need to use another method for hanging.)


Repeat with all three letters,


and now they are ready to go up!


If you make some of these, I'd love to see how you made them your own!

Friday, July 23, 2010

I'm a Believer

I've been needing tie-backs for the curtains (see the curtains?) in our master bedroom for, oh, about three years. (Coincidentally, that's about when I moved in.)


I saw some that had a leaf motif that I liked, but the color just wouldn't work with the palate I wanted in the room. Then the tiebacks I've been eying for three years went on sale, and I had to jump at the chance. I got two sets (I have three windows on that wall, one large and two smaller ones on either side. I figured 4 tie-backs should cover it).


And enter oil rubbed bronze spray paint. People have been raving about this on blogland forEVer, but I could never find any, and I didn't have a specific project in mind for it, so I kept putting it off. Now I had a project, and I couldn't wait to see what all the fuss was about.

I took out all the parts, laid them on newspaper and got to work.


I sprayed from every angle (as in, from each side if there was an imaginary square around it) and from the top. Let it dry, then one more coat. Once it was dry (and I gave it plenty of time) I flipped all the pieces over and repeated.

Ta da! The lighting doesn't do much for this pic, but trust me when I tell you they are perfect. A nice rich shade of brown with wonderful metallic accents as the light hits it.


I think they will go perfectly with the floral print on my valance boxes and bedspread.


Now I just need to hang them up!