Showing posts with label Seasonal Decor. Show all posts

Tuesday, April 24, 2012

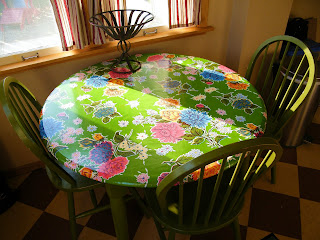
Faux Oilcloth-Covered Kitchen Table

No Ten on Tuesday today.  Instead, I want to share a quick project I worked on this weekend.  


There's a saga behind this project, but I won't bore you with the details.  Instead, let's look at some pretty pictures:
 (Please follow the source link before pinning these - they aren't my projects, and I shouldn't get credit.  Thanks!)


Gorgeous oilcloth-covered tables!  And they used several different methods for covering: staple gun, sewing elastic around the edge, sewing a seem to fit, even hot glue!  

I wanted to replicate the look on the cheap and easy.  I wasn't sure how it would work in my kitchen, so I didn't want to commit without trying it out (which meant staples, nails, and glue guns were out).  And I didn't want to sew, which meant the other methods shown were out as well.  

So first I started with a vinyl tablecloth from Target. WAY cheaper than oilcloth, and I wouldn't be nearly as upset about cutting it up (or throwing it away if I didn't like it).  I put it on top of the table and cut around the perimeter about 6" away from the edge of the table.  Next, I cut little slits all along the edge of the tablecloth about an inch from the edge. I used a safety pin to weave string through the slits.  Pulled it snug, tied it off, and called it good. 


 Seriously cheap AND easy.  


I LOVE how it looks.   I love that it doesn't cut off my line of sight like a tablecloth does.  My husband and I both love that we can wipe it off with a washcloth.  I love that when I get tired of it, I can buy another one without freaking out about how expensive it was and how much time and effort I poured into it.  

I'll be linking this to the parties on the left!

Tuesday, October 25, 2011

Halloween Wreath

No guarantees or anything, but I might start posting more frequently than every three months.  I finished the project I mentioned in June 8 weeks ago today.  Mason Bryce was born 5 1/2 weeks early at a healthy 6 lb 10 oz.  He had to spend a week in the NICU, but all things considered, we feel very blessed that there were no other complications. 
I've been working on quite a few projects the last few weeks, but one of them has been trying to fix a virus on our computer, so my blogging has stayed back burner.  I did want to hop on really quick to share a picture of my Halloween changing seasons wreath, though.


It's inspired by my wreath last year and all the wreaths I've seen in my blog-walking and on pinterest that are wrapped-yarn.  I still love those bats.  And I'm still loving teal.

Monday, May 3, 2010

May Flowers and My Wreath

(This post has three unrelated thoughts which will come together to make sense by the end of the post. Promise.)

Thought 1: Remember my Spring Wreath?

I've had it for about a month now, and that's about as long as my attention span can handle. So I've been thinking of changing it, but I wasn't sure what else I wanted to do with it.

Thought 2: I LOVE fabric flowers. In fact my second post on this blog was about fabric flowers. But I haven't done anything with them. The only flowers I've tried so far are the kind on the spring wreath. So with May coming up, I was toying with the idea of doing a May Flowers feature this month and showing (or more likely referencing) a new flower each day of the month. I even came up with a button for it:


But trying to get a new post up every day is more than impractical, it's impossible, so that idea never really took flight. Which is sad, cause I thought a month of May Flowers would be a lot of fun.

Thought 3: Then today I was flipping through my reader and came across this post over at LollyChops. And I absolutely fell in love with this new wreath she's done:


Check out the close-up. Isn't it incredible?


She e
ven has a few flowers similar to those on my spring wreath (see the white one below?).


Combining the thoughts: I think I'm going to take the flowers I already have on my spring wreath, make up some more of the others that I've been wanting to make (a LOT being from Lolly Chops, in fact) and revamp my wreath LollyChops-style. Since I'm still in the middle of about, oh, 5 projects, we'll see how this turns out. I'll try to update as I try new flower tutorials, as a compromise on a new May flower post every day. I would LOVE if you would leave me links to some of your favorite flower tutorials that you think would work for this new wreath-vision. Wish me luck!

Monday, April 5, 2010

Spring Wreath

The Easter Wreath to Spring Wreath transformation is only slightly more work than the St. Patty's Day Wreath to Easter Wreath transformation was. I don't even have any tutorial pics because I knew where a great tutorial was. All you need is a few sheets of felt in whatever color(s) you want, safety pins (optional), and pearl-headed or other pins.

So, here are the steps:
1 - follow this tutorial to make as many little flowers are you want. I chose to cut a sheet of felt into 4 rectangles and used those to make ovals rather than circles. It worked just as well. And if you're like me and hate hand-sewing, use two safety pins across the back to secure the flowers. Since these are going on a wreath rather than to be worn as an accessory, you can get away with this. Though I have sewn these before and they really are super easy.
2 - remove the eggs from your Easter Wreath and either store until next year or let your 14-month old use them to continue to learn about gravity, like me. (If you don't have the Easter Wreath to start with, you can follow this tutorial to make a wreath base for the Changing Seasons Wreath and then follow this tutorial to add the greenery.)
3 - place the flowers as desired on your wreath using a pearl-headed pin (or another sewing pin if you can't find any - just push the tip of the pin in further if you don't want it to be visible.) I tried to put them near the felt "leaves."

And you're done! Super easy and will last until you get bored. I might add some more (and bigger) flowers over the next few days.


I'll be linking to the parties on the left.

Thursday, March 18, 2010

Easter Wreath

Remember my St. Patrick's Day wreath?


In this post, I'll show you my super-quick costume change from that St. Patrick's Day wreath to this Easter Wreath!

First, gather your supplies. I got a bag of cheapo plastic Easter eggs from Target, though you can find them pretty much anywhere. I also needed some quilting pins.


Now, if you're lucky (like me), your Easter eggs will already have these handy little holes at each end and therefore on each half of the egg. If you're not as lucky, I can think of a number of easy ways to make similar holes. My first stop would involve a candle, a nail, and a pair of rubber-handled pliers. :)


So, pop the egg in half and notice how the pin slides nicely into that handy hole.


Place the half where you'd like the egg to be and just slide the needle all the way in. Your egg will now look something like this.

Pop the top half on, et Voila! An Easter egg which is VERY easily removable.


Now repeat the previous steps for as many eggs as you want to use. I varied pinning the bottom or top half for my karma (also known as OCD), but however you prefer to do it is great. I opted not to use the green eggs because I didn't think they would show up very well against all the other greenery. Finally, the finished product!


I admit, they kind of look like Christmas lights to me in this picture, but they're VERY Easter-y in person. Trust me. ;)

I'll be linking to the parties on the left.

**Edited to add I'm also linking to:


Wednesday, March 17, 2010

Table Runner

For my easy-storage seasonal decor, I was planning on getting a plain colored tablecloth and making different runners for each season. Stacey over at Icing on the Cake gave me a new and even less-to-store idea!


This table runner involves the same basic material for the entire runner with seasonal ribbons and shapes you can change out. Brilliant! I'm definitely putting this on my to-make list!

Thursday, March 4, 2010

Seasonal Decor Blocks pt. 2

I edited my Seasonal Decor Blocks post when I thought I'd found a really clever way to add one block to the original seven and get four more words than just the original 16. Later, I went to the original post at Little Birdie Secrets where I found even MORE great ideas in the comments section! With only TEN blocks, you can create THIRY different words! None of the words use all the blocks (though if someone sees a word that works, PLEASE tell me!), so you may be wondering what to do with the extra blocks while you have one word displayed.

Here's one idea:


Just use ribbons, other knick-knacks, or notions to accessorize (and don't take a picture from the side!). Another idea - maybe you can make two short words with the blocks and display them in different locations? I'm not sure if any of the words lend themselves to this, but it sure would be fun.

So what are the magic blocks and words? The blocks are as follows (with the first 7 being the original 7):

Block One: H Y E D
Block Two: A C R S
Block Three: R P E T
Block Four: V N L O
Block Five: E O M D
Block Six: S M K I
Block Seven: T F B W
Block Eight: U A G L
Block Nine: P J I H
Block Ten: F P S C

And all the wonderful words you can make (in the most haphazard order!) are:

Harvest
Welcome
Faith
Family
Spooky
Friends
Winter
Freedom
Blessed
Snow
Home
Hope
Monster
Mother
Dream
Easter
Lucky
Love
Santa
Glory
Romance
Pumpkin
Frosty
School
Autumn
Spring
Summer
Father
Fall
Happy
Merry
Fairy
Fairies
Jolly
Flowers
Wishes
America
**Edited to add:
Birthday (Thanks, Tiffany!)
**Comment on the original Little Birdie Secrets post by Kalynne also gives us:
Flake, Hearts, Christ, Jesus, Bloom, Flag, Irish, Sun, Swim, Pool, Ghost(s), Witch(es), Vampire, Fright, Thanks, Leaf, Treats, Turkey, Jewels, Cuddle, Pillow, Party, Heart, Smile, Wonder (that's a total of SIXTY words!)

If you make a set, please post a link in the comments section. I would LOVE to see how y'all took this idea and ran with it! Have fun!

Linking to the parties on the left and:


Whatever Goes Wednesday

Saturday, February 27, 2010

Seasonal Decor Blocks

**For more fun ideas, check out post 2 when you finish reading this post!**

These have been floating around the blogosphere for a while now, but it took me a few months to finally pull everything together to make my set. I first saw these when
Little Birdie Secrets posted about them, but I modified it slightly. I
love that you can make up to sixteen seasonal words (maybe more?) with only seven blocks.

I started with a 4"x4" I picked up at Lowe's for a few dollars. I wanted blocks bigger than 1.5". In retrospect, I think the smaller blocks would have worked, but I do like the larger blocks. I found out that I needed to get the lumber when I had my in-laws' truck because the 4"x4"s are too wide for them to cut down for you in the store (unlike the 2"x4"s, etc). I then took it over to use my FIL's miter saw (which I totally covet) to cut the 4"x4" into cubes. It made 19 cubes, so I have enough for another set and perhaps some blocks for my son.

I got tired of waiting for the weather to warm up, so I tried spray-painting them while it was at least light outside even though it was still below freezing. I don't recommend it.

I wanted a combination of colors that would be neutral while allowing me to combine them with seasonal specific colors, so I went with black and ivory. The first coat was a very minimal coat of black just on the edges.


I probably could have gone darker. Live and learn. The next 18(ish) coats (reminder: I
really don't recommend spray painting when it's freezing outside) were Krylon Ivory. When I finally decided it was enough and that I should just decide to like the texture and grain of the wood showing (which didn't take long; I do like it), I sanded them all down. I sanded a little extra on the edges so that the black would show through a little.


I used my MIL's cricut to cut the letters out of plain black scrapbooking paper. At first I intended to use vinyl, but I decided I was too cheap). I bought some mod podge to see what all the fuss was about (I know, how can I call myself a crafter? thankfully I saw the error of my ways. Mod Podge does rock). I attempted to accomplish a slightly more whimsical (pun
definitely intended) effect by varying capital with lower case letters and the letter thickness from block to block. This is the result:


I think that I do like the result of the varied letters. I haven't decided where to put the blocks, though! They look awful on my white mantel, but the living room furniture is in flux right now, so hopefully you'll see them soon (with other seasonal decor!) on a bookcase or end table.

This is the list of letters you need for each block (borrowed from Little Birdie Secrets):

Block One: H Y E D
Block Two: A C R S
Block Three: R P E T
Block Four: V N L O
Block Five: E O M D
Block Six: S M K I
Block Seven: T F B W

And these are the words you can make:

Harvest
Welcome
Faith
Family
Spooky
Friends
Winter
Freedom
Blessed
Snow
Home
Hope
Monster
Mother
Dream
Easter

I'll be posting to the parties listed to the left.

**edited to add: I got to looking at this list last night and realized that if I add one more block, I can make 4 more words. Adding a block 8 with the letters U A G L, you can make the words Lucky, Love, Santa, and Glory. Can anyone see any other words we could make with those 8 blocks? Maybe one that uses all 8?


**another edit: also posting to -


Monday, February 22, 2010

St. Patrick's Day Wreath

Remember this wreath?
What do you think that wreath has in common with this wreath?

They're actually both THIS wreath!


When I finally got around to it, I took down my valentine's wreath and in about 2 minutes had the boas and felt unpinned and stuffed into a gallon ziploc bag:


That ziploc bag is the whole motive for this wreath - VERY minimal storage during the other seasons. I may be singing a different tune when I try to refluff all that in a year, but until then, so far my plan is working perfectly. :)

So how did I turn my plain wreath into a St. Patrick's Day wreath? First I gathered about nine yards of 3"-wide green fabric (I happened to find a twill that was a shade of green I liked, but just about any cotton would work). I blogged in more detail about my extremely accurate gathering process here. I also grabbed a spool of green tulle. I wanted some of the fluff that the valentine's wreath had but less diva-ish.

My first step was to gather the tulle as well. I just gathered until I got bored and then started pinning it onto the wreath. When I ran out of length, I gathered some more. To pin it on, I started on the back side and just pinned in a zig-zag around the wreath:

When I got back to where I started, I continued the zigzag pattern but in the bare spots between the previous zigzag. Like the technical explanation? I hope it makes sense. So this is what I had when I was finished with the tulle.

I then grabbed my gathered 3" cotton and began pinning the same way I pinned the boa and felt for the valentine's wreath:

THIS is the monstrosity that resulted. It's TERRIBLE! I thought it looked like iceburg lettuce which is NOT the look I was going for!

But it was late, so I slept it off and the next day (or two) decided to try a change of tactic. I unpinned the cotton (which took about two minutes), and started pinning it down in the same zig-zag pattern I'd used with the tulle. When I finished, I was MUCH happier. But it still wasn't enough (sorry, I forgot to take a picture). I grabbed a sheet of cheap green felt (none of that expensive wool stuff for me), and cut it into triangles 3" wide and 4" long (or so). I then used a pin along the short end to do a kind of "running stitch" like this:

Then I pinned it tightly into the bare spots:

Which then looked like this:

I then used some of the tulle to hang it from the wreath hanger so that it was in a more pleasing position on the door. No other rhyme or reason.

So for the next few weeks, my changing season's wreath will be all-green for St. Patty's Day, but I've got plans for a quick costume change after that, so stay tuned!


Linking to these parties:

The Girl Creative

The DIY Show Off

Making


DIY Day @ ASPTL

Photobucket


Someday Craft's Whatever Goes Wednesday


giveaways