I love libraries. I used to go to the library all the time growing up. And I think I read most of the sci-fi section in our small local library during high school. Lately I don't have as much time to sit down to read a book, but soon after I started my first real job 3 1/2 years ago, I realized I needed some audiobooks for the commute. (Am I the only one who still calls them books-on-tape half the time? Even though they're cds?) So I'm well in to my 30 Before Thirty goal of reading The Chronicles of Narnia. I listened to The Magician's Nephew last week, and while it wasn't full of action, it was entertaining, and I found the symbolism fascinating. Now I'm waiting for The Lion, The Witch, and The Wardrobe, so I can continue the series.
In other 30 Before Thirty news, both of the red fish died. Lame. We'll get others this weekend at Petsmart, I think. Maybe guppies, since I kill fish even faster than I realized.
Also, I made my new lanyard for my badge at work. Fake pearls. I didn't want to tell until I'd tried it because I thought it might look dumb, but I'm a fan. They're super safety-conscious around here, so our lanyards have to have a breakaway (velcro or something that will release, so we don't get garroted or something. I don't know why. I work in an office. But whatever). I wasn't sure how to work that into looking "classier" until my friend suggested a magnetic clasp. Genius. Pictures to follow; I keep forgetting when I'm at home in the evenings, and the guys at work would give me such a hard time if I tried to get a pic at the office. :)
I'm considering stringing the glass pearl beads for the lanyard as making a piece of jewelry. That would make it a twofer. I love the word twofer.
Enough rambling. Happy Friday, Friends! Enjoy the weekend!
Friday, July 30, 2010
Monday, July 26, 2010
Sunday, July 25, 2010
And Thus It Begins
One dead fish. Already. One of the reddish-orange ones. And it didn't even have the grace to die and float to the top like a normal fish. It went into the "plants" to kick the bucket, and I had to fish (pun seriously intended) it out. Yuck. And I sound callous because I think it's ridiculous that I was upset after having the fish for only five days. We're definitely getting fish from Petsmart from now on. I don't care if Wal-Mart is 6 times closer (round-trip, that's no exaggeration). Sheesh.
In other news, the topic for the Relief Society lesson today was Journal Keeping. Further proof that Heavenly Father both hears and answers prayers and cares about my 30 Before Thirty goals.
In other news, the topic for the Relief Society lesson today was Journal Keeping. Further proof that Heavenly Father both hears and answers prayers and cares about my 30 Before Thirty goals.
Friday, July 23, 2010
I'm a Believer
I've been needing tie-backs for the curtains (see the curtains?) in our master bedroom for, oh, about three years. (Coincidentally, that's about when I moved in.)

I saw some that had a leaf motif that I liked, but the color just wouldn't work with the palate I wanted in the room. Then the tiebacks I've been eying for three years went on sale, and I had to jump at the chance. I got two sets (I have three windows on that wall, one large and two smaller ones on either side. I figured 4 tie-backs should cover it).

And enter oil rubbed bronze spray paint. People have been raving about this on blogland forEVer, but I could never find any, and I didn't have a specific project in mind for it, so I kept putting it off. Now I had a project, and I couldn't wait to see what all the fuss was about.
 I took out all the parts, laid them on newspaper and got to work.

I sprayed from every angle (as in, from each side if there was an imaginary square around it) and from the top. Let it dry, then one more coat. Once it was dry (and I gave it plenty of time) I flipped all the pieces over and repeated.
Ta da! The lighting doesn't do much for this pic, but trust me when I tell you they are perfect. A nice rich shade of brown with wonderful metallic accents as the light hits it.

I think they will go perfectly with the floral print on my valance boxes and bedspread.

Now I just need to hang them up!

I saw some that had a leaf motif that I liked, but the color just wouldn't work with the palate I wanted in the room. Then the tiebacks I've been eying for three years went on sale, and I had to jump at the chance. I got two sets (I have three windows on that wall, one large and two smaller ones on either side. I figured 4 tie-backs should cover it).

And enter oil rubbed bronze spray paint. People have been raving about this on blogland forEVer, but I could never find any, and I didn't have a specific project in mind for it, so I kept putting it off. Now I had a project, and I couldn't wait to see what all the fuss was about.
 I took out all the parts, laid them on newspaper and got to work.
I sprayed from every angle (as in, from each side if there was an imaginary square around it) and from the top. Let it dry, then one more coat. Once it was dry (and I gave it plenty of time) I flipped all the pieces over and repeated.
Ta da! The lighting doesn't do much for this pic, but trust me when I tell you they are perfect. A nice rich shade of brown with wonderful metallic accents as the light hits it.

I think they will go perfectly with the floral print on my valance boxes and bedspread.

Now I just need to hang them up!
Thursday, July 22, 2010
Aquarium - Cross It Off the List
It's amazing how quickly you can get things done when you have a list to cross off. Getting an aquarium was number 26 on my 30 Before Thirty list, and we took care of that 3 short days after I posted my list. Sweet! It's nothing fancy, but Lincoln loves it, and we all like to watch the fish.

Here's my question: why is the water already cloudy? We've only had fish in it for 24 hours. Any ideas?
We think there are more fish in this tank's future. Four (the sucker fish is hiding) still seems kind of sparse.

Here's my question: why is the water already cloudy? We've only had fish in it for 24 hours. Any ideas?
We think there are more fish in this tank's future. Four (the sucker fish is hiding) still seems kind of sparse.
Wednesday, July 21, 2010
Polish Pottery and Melodrama
Is anyone else familiar with polish pottery? This is a sad tale.
Background:
I spent my last three years of high school living in Germany since my dad was in the Air Force. My last Christmas, I knew I would be going to college in the fall, and I told my mom I would like some pieces of polish pottery to take with me. So for Christmas that year she surprised me with a gift certificate for polish pottery AND a road-trip to Poland to pick the pieces out on site! Swoon. That was definitely one of my favorite Christmas presents ever.
I didn't use most of my pieces at college until I no longer had roommates because I knew they would get broken. In fact, the one piece I took with me (my favorite mug) did get broken. Because my sweet roommate was doing her dishes and decided to wash mine, too. She was so upset! I was as well, but I could hardly be upset with her for trying to be a good roommate.
Now to this past week. I was cooking dinner, and Lincoln (almost 18 months) was getting into the cupboards and pulling out pots and pans and such. Whatever keeps him happy. I even saw him open the cupboard where some of my pottery is, but I assumed in my distraction that he'd go for the drawer in there with the spoons and such. No dice. He pulled out my pottery baking dish (which had another glass baking dish stacked inside). His poor arms didn't stand a chance to hold them up once they were out. They crashed to the floor, and the pottery cracked before I realized my mistake.
Just one of those things, right? At first I thought I could maybe glue it back together, but I would be pretty scared to bake something in a dish that was glued. I'm pretty sure glue isn't made to hold so well at 425°F. It's sat on the counter since (like salt in a wound) while I've debated the pros and cons of trying to glue it back together, and I finally decided I'm better off trying to replace it. I checked ebay, but nothing seemed to fit my picky bill. I'm open to new designs, but I tend to prefer the simpler styles. So I thought I'd share my woe and see if anyone has some ideas for me.
To recap, here's my dish looking very similar to how it's looked these last mumble-mumble years (if you ignore the slight crack lines):

And here's the bitter truth:

If you made it this far, blessings on your heads. And I sound (way) more melodramatic than I really feel, so don't worry that I'm crying into my soup at night. But I would love some links if anyone knows somewhere stateside where I could get something similar. Thanks. ;)
Friday, July 16, 2010
30 Before Thirty
This is a shameless copy-cat of Nicole at Making it Lovely. I saw her original post regarding her 30 before thirty back in March, and she's mentioned it in the past few months as she's crossed things off her list. The idea has been growing on me, and the other day I realized 30 is creeping up on me much faster than I expected. I decided some concrete goals would be fun to work on for the next six months, so I made a list for myself. It's surprisingly difficult to come up with 30 realistic goals (realistic mostly meaning that it can't require too much money. So a trip to New York to see Wicked on Broadway is right out). Also, I would have loved to just copy and paste Nicole's list, but most of her goals don't really apply to me. For instance, I've dyed my hair red more times than I can count, and right now I'm trying to do no more than highlights and low lights. Also, I have no intention of giving up soda. I've done that, and I think my quality of life is significantly higher when it includes diet Mt. Dew. I did borrow some from her, though (like paying off the credit card).
But, enough rambling. I have until February 3, 2011 to complete the following (not in order of difficulty, though somewhat grouped by category):
Like Nicole, I'll cross these off as I finish. Anyone interested in joining me with as many items as your next birthday? I'd love to see some other ideas! Some of these are a bit of a stretch. :)
But, enough rambling. I have until February 3, 2011 to complete the following (not in order of difficulty, though somewhat grouped by category):
- learn to work with fondant
- learn to juggle
- read and study Drawing on the Right Side of the Brain
- try jewelry making - at least a pair of earrings
- buy essential oil and use in a project
- finish the clock project over the mantel
- finish my throw pillows
make a prettier lanyard for my work badge- make blankets and/or host a drive for blankets for Project Linus
- open an Etsy Shop
- try geocaching
- go to the zoo or aquarium with Tyler and Lincoln
- find a treasure at Unclaimed Baggage
- read The Chronicles of Narnia
- write an ebook
- compete in a mini-triathlon
- unlock all the exercises on my Wii Fit
- establish (and use!) a budget
- resume keeping a journal
- read Catch-22
- ruthlessly de-clutter the house
- hang pictures
- finish the mini-reno in the kitchen
- do the mini-reno in the master bathroom
- organize three months of food storage
get an aquarium- get a bonsai tree
pay off the credit card- establish a habit of having Family Home Evening
- ??? (this one is a surprise! I know, I’m lame. But I’ll tell you when I’m done!)
Like Nicole, I'll cross these off as I finish. Anyone interested in joining me with as many items as your next birthday? I'd love to see some other ideas! Some of these are a bit of a stretch. :)
Wednesday, July 14, 2010
Poof Pillow Tutorial
I know I haven't posted very often lately, but please don't give up on me! It's been a perfect storm lately, but I think I'm getting my momentum back. :)
A month ago I directed you to this tutorial I did for Ucreate. Now I'm sharing my gathered-ribbon poof pillow tutorial with you here!
 So, begin by gathering your supplies:
 Now, keeping the pen at the same angle, drag it from one side to the adjacent side, so that you're drawing 1/4th of a circle. It should look something like this:

Take your ruler and measure out from the center of the material (which will be one of the corners of the folded fabric), mark half the width of the pillow plus 1/2" for seam allowance. Do this from the center all along the top of the folded material. Now connect the dots, following the edge of the quarter-circle, and pin along the curve you just marked. It should look like this:

Notice that I have the pins just to inside of the curve so that I can cut along the mark. Unfold, and you should have very close to a perfect circle:

Lay your circle of material on top of your pillow form to see if you like the fit or if you want to trim a little before you start:

Now cut two pieces for an envelope closure on the back. Cut one about 1/2 the height of the pillow, and one 2/3 the height. Fold and pin for a simple seam on each exposed edge. Use the circle front to get an overlap that looks about like this:

Then, starting at one side, begin pinning along the seam. This is the back to show the pins:

Now use your front as a template to mark the circle onto the back:

And cut along your marked line:
 When you're done cutting the back pieces to the shape of your front, very carefully take the pins out one or two at a time and switch them to pinning just the two pieces of the back together so that you can work with the front foundation fabric. You'll want the back pieces to be pinned together until the very last step.
 Now continue gathering, pinning, and sewing:


 The gather should make it fluff enough that you can leave the center like this, but if you would like to add something, you could use a fabric flower, a fabric-covered button, or a decorative button just to give you some ideas.

Finishing
The trickiest part of attaching the back is avoiding the first line of ribbon. Just fold the ribbon towards the middle at the free side and pin the cover and the back with right sides together. At the very beginning of the ribbon along the edge, sew the raw edge of the ribbon sandwiched between the foundation fabric and back. It should look like this along the edge when you pin it:
 Now carefully take out the pins holding the envelope closure together and flip it right-sides out through the opening. Stuff the pillow form into the cover:


A month ago I directed you to this tutorial I did for Ucreate. Now I'm sharing my gathered-ribbon poof pillow tutorial with you here!
 So, begin by gathering your supplies:
3/4 yard of a solid color for the foundation fabric and the back
6-10 yards of ribbon (depending on width, how gathered you want it, and size of your pillow. color should coordinate with the foundation fabric but doesn't need to match exactly.)
pillow form
ruler
fabric marking pen
string (if you're going to follow my steps to turn a square pillow form into a circle)
sewing scissors
sewing pins
I'm going to first show you how to turn a square pillow form into a circle. You can skip this step if you have a circular pillow already or if you want to follow the tutorial but onto a square instead of the circle. One of the nice things about doing this, though, is that your pillow form ends up being very full and giving a great shape to your finished cover.
Transforming the Pillow Form
Begin by measuring the pillow and marking the center on all four sides. then connect the marks across the top of the pillow to find the center. Once you have the center, push a pin with string attached into the center and tie your fabric marking pen onto the string at a good length for you to be able to reach the center of one of the sides. Like this:
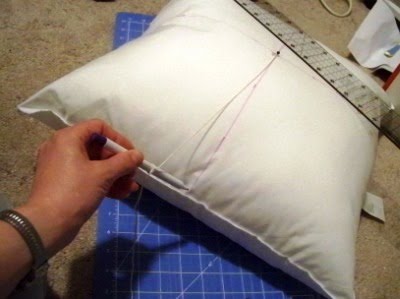 Now, keeping the pen at the same angle, drag it from one side to the adjacent side, so that you're drawing 1/4th of a circle. It should look something like this:
From here, push all the stuffing into the center of the pillow, and pin your mark to the back of the pillow:
Notice here that you can see two lines? I messed up, but it's ok because this will be hidden inside the pillow and I'm using a fabric marking pen that disappears. ;)
Now take it to your machine and sew (carefully!) along your mark. Make sure to take your pins out before you sew over them. Sometimes I risk it, so I have a bunch of bent pins and a few broken needles. Learn from my mistakes! (Or just buy lots of pins and needles.)
If, like me, you hate hand sewing with a passion, follow me and do this with your machine. If you don't mind sewing, I think this can be hand stitched as well. Just make sure your stitches are close and tight.
Next cut off the excess corner (sorry, no picture).
Continue and finish the other 3 corners, and now your pillow form should look like this:
Yay! You're just taken a square pillow form and turned it into a circle. This could also be modified for other simple shapes.
Cutting the Front Foundation Fabric and Back Pieces
Now take out your foundation fabric, iron it, and cut out a square an inch or so longer on each side than your pillow form is wide (hint: the original tag should show the dimensions. If not, just measure across one of the center lines you have marked). Once you have the square cut, fold it in half and then again in half the other way. Now you should have a square of material like this:

Take your ruler and measure out from the center of the material (which will be one of the corners of the folded fabric), mark half the width of the pillow plus 1/2" for seam allowance. Do this from the center all along the top of the folded material. Now connect the dots, following the edge of the quarter-circle, and pin along the curve you just marked. It should look like this:

Notice that I have the pins just to inside of the curve so that I can cut along the mark. Unfold, and you should have very close to a perfect circle:

Lay your circle of material on top of your pillow form to see if you like the fit or if you want to trim a little before you start:

Now cut two pieces for an envelope closure on the back. Cut one about 1/2 the height of the pillow, and one 2/3 the height. Fold and pin for a simple seam on each exposed edge. Use the circle front to get an overlap that looks about like this:

Then, starting at one side, begin pinning along the seam. This is the back to show the pins:

Now use your front as a template to mark the circle onto the back:

And cut along your marked line:
 When you're done cutting the back pieces to the shape of your front, very carefully take the pins out one or two at a time and switch them to pinning just the two pieces of the back together so that you can work with the front foundation fabric. You'll want the back pieces to be pinned together until the very last step.
Mark the Front Foundation Piece
Measure the width of your ribbon, and mark a curve about 1/4" less than that away from the edge (so for a 1.25" ribbon, mark each 1"). To start, make a mark on the edge and another at the correct distance from the edge about 5" along the perimeter. So your line should look something like this to start: Now continue along the perimeter:
Once you get your first line drawn, you need to mark a approximate distances across the whole surface of the front foundation fabric. To do this, I marked my center point and then put my ruler across that point and marked every 1-inch interval. After turning the ruler and doing this across the fabric several times, it looked like this:
Then fill in any emptier spots:
And a few more for good measure, if you're like me and can't draw a good curve without help:
Now begin at your outside line and spiral toward the middle following your starting point to make the jump to interior circles. It should look like this when you're done:
It gets a little tricky toward the center. Just do the best you can. You'll be covering this with gathered ribbon, so it's pretty forgiving.
Gathering the Ribbon
Now it's time to get started with your ribbon.

I combined the steps for gathering that I used here with this clever tip from Little Birdie Secrets. I created my gather along one side. To begin I did a back stitch.
Then, using my seam ripper to scrunch it, I sewed slowly as I pushed the ribbon toward the presser foot. After a few inches, it starts to look like this:
Keep doing this until you need a break or you reach the end of your first spool of ribbon (if you do reach the end, stop about 5 inches short and backstitch. I'll show how to continue to another spool in a few steps). I decided to switch back and forth between gathering the ribbon and sewing it to the foundation fabric, so I just back-stitched when I got tired of gathering and switched.
Sewing the Ribbon to the Foundation Fabric
Beginning at the mark starting on the extreme outer edge, start pinning along your line towards the center. Don't worry about the raw end of ribbon hanging off the side; we'll take care of that when we sew the front and back together. Now use a straight stitch to sew the gathered ribbon along the line. As I said before, this doesn't have to be a perfect straight stitch - the gather of the ribbon makes this very forgiving. When you've finished the first line, it should look like this:
 Now continue gathering, pinning, and sewing:
 Until you've finished the first spool of ribbon.

When you get to the end, pin the start of your new ribbon to the end of your first ribbon, right on top with a 1/4" overlap rather than right sides together as you usually do. Then use a zigzag stitch to attach the two. I usually go back and forth across the entire length to make sure it's nice and secure. It should look like this:

Now continue gathering, pinning, and sewing (and attaching ribbons depending on the length of a spool) until you reach the center.
 When you get to the center, just fold the very end over about 1/4" and stitch the center down with a straight stitch in an x-shape at the center:

 The gather should make it fluff enough that you can leave the center like this, but if you would like to add something, you could use a fabric flower, a fabric-covered button, or a decorative button just to give you some ideas.
Now you're done with your cover and ready to attach the back:

Finishing
The trickiest part of attaching the back is avoiding the first line of ribbon. Just fold the ribbon towards the middle at the free side and pin the cover and the back with right sides together. At the very beginning of the ribbon along the edge, sew the raw edge of the ribbon sandwiched between the foundation fabric and back. It should look like this along the edge when you pin it:
 And this when you're done sewing:
 Now carefully take out the pins holding the envelope closure together and flip it right-sides out through the opening. Stuff the pillow form into the cover:
 And you're done!


Subscribe to:
Posts (Atom)